
To keep your kitchen sponge hygienic, sanitize it daily if you use it often, using methods like microwaving damp sponges or soaking in a bleach solution. Toss the sponge when it develops a sour smell, shows signs of fraying, or remains dirty despite cleaning. Regular replacement helps prevent bacteria buildup and cross-contamination. Stay informed on best practices, so your sponge stays safe and effective — and you’ll learn more to maintain top kitchen hygiene.
Key Takeaways
- Sanitize sponges daily if used multiple times, and every few days if used less frequently.
- Microwave damp sponges for 1-2 minutes or soak in bleach solution to kill bacteria effectively.
- Replace sponges weekly or immediately when they develop a sour smell, stains, or show signs of wear.
- Discard heavily contaminated or frayed sponges to prevent cross-contamination.
- Use fresh sponges regularly to maintain kitchen hygiene and reduce bacterial buildup.

Keeping your kitchen sponges clean is essential to prevent the spread of germs and bacteria that can cause foodborne illnesses. Sponges are notorious breeding grounds for bacterial growth because of their damp, porous nature and constant contact with food debris and moisture. To minimize health risks, you need to pay close attention to your cleaning frequency. How often you sanitize your sponge directly impacts bacterial build-up. If you use it multiple times a day, it’s best to disinfect it daily. For less frequent use, sanitizing every few days can suffice, but always replace it once it shows signs of wear or persistent odor. Regularly cleaning your sponge helps keep bacterial growth in check, reducing the chance of contaminating your dishes or countertops.
When it comes to cleaning your sponge, the goal is to kill bacteria effectively. You can do this by microwaving your damp sponge for about one to two minutes, which heats the moisture inside and kills most germs. Alternatively, soaking it in a bleach solution (one tablespoon of bleach per cup of water) for five minutes is also effective. These methods are quick and efficient ways to sanitize your sponge between regular replacements. Just make sure the sponge is thoroughly wet before microwaving, and rinse it well afterward. Consistent cleaning frequency is key to staying ahead of bacterial growth and ensuring your sponge isn’t a germ reservoir. Additionally, using UV sterilization devices can be an effective supplementary method for reducing bacteria on sponges and other kitchen tools.
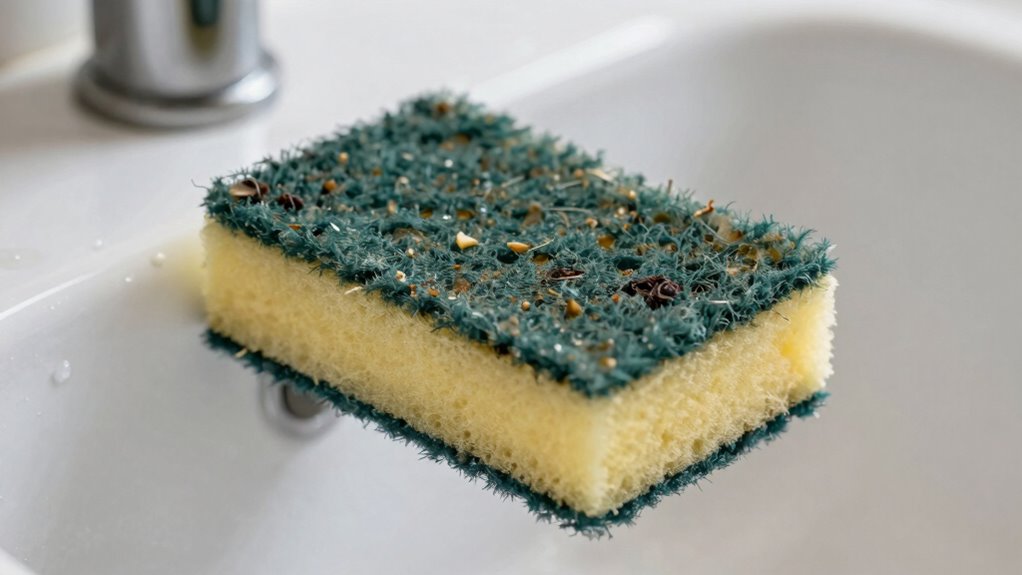
Despite diligent cleaning, sponges won’t last forever. Bacteria can embed deep within the porous material, making it difficult to eliminate all germs completely. When your sponge starts to smell sour or shows signs of deterioration—such as fraying, discoloration, or persistent grime—it’s time to toss it. Relying solely on cleaning methods isn’t enough once a sponge becomes heavily contaminated. The longer you use a worn or smelly sponge, the higher the risk of cross-contamination. For safety and hygiene, it’s better to replace your sponge regularly—at least once a week if you’re using it daily. Using a fresh sponge minimizes bacterial growth and keeps your kitchen cleaner overall.
Dr. Brown's Microwave Steam Sterilizer Bag for Baby Bottles, Breast Pump Parts & Other Toddler Accessories, 100% Silicone, Reusable Sterilizing Bag
REUSABLE SILICONE MICROWAVE STERILIZER BAG. Quickly sterilizes baby bottles and parts, breast pump parts, pacifiers, teethers, and more
As an affiliate, we earn on qualifying purchases.
As an affiliate, we earn on qualifying purchases.
Frequently Asked Questions
How Often Should I Replace My Kitchen Sponge?
You should replace your sponges for cleaning every 1 to 2 weeks. If you notice mold, bad odor, or if the sponge material types show wear or tears, toss it sooner. Regularly sanitize sponges made of different materials like cellulose or synthetic fibers to prevent bacteria buildup. A quick microwave or dishwasher sanitize helps, but replacing sponges regularly keeps your kitchen safer and cleaner.
Can I Sanitize Sponges in the Dishwasher?
Yes, you can sanitize sponges in the dishwasher. Use the dishwasher’s sanitizing cycle or run it on a hot water setting to effectively kill germs. This method helps improve sponge longevity and keeps your kitchen hygienic. Just make sure to squeeze out excess debris before placing it in the dishwasher, and replace your sponge regularly, especially if it starts to smell or wear out, to maintain a clean and safe kitchen.
Are Natural or Synthetic Sponges More Hygienic?
Natural sponges made from eco-friendly materials are often more hygienic because they dry faster and resist bacteria buildup better than synthetic ones. Synthetic sponges can harbor germs more easily, especially if they retain moisture. However, both types require regular sanitizing and replacement. Choosing natural sponges supports eco-friendly practices, but guarantee you sanitize them frequently. Ultimately, the best option depends on your cleaning habits and commitment to sustainability.
What Are the Signs My Sponge Needs Disposal?
Ever wonder if your sponge has outlived its usefulness? If you notice persistent bacterial growth, mold development, a foul smell, or visible discoloration, it’s time to toss it. These signs indicate that the sponge can harbor harmful germs, making sanitizing ineffective. Don’t risk cross-contamination—replace your sponge regularly to keep your kitchen hygienic and safe. When in doubt, it’s better to be safe than sorry.
Is It Safe to Reuse a Sponge After Sanitizing?
Yes, it’s generally safe to reuse a sponge after sanitizing, especially if you use a dishwasher safe sponge and follow proper cleaning steps. Make sure to run it through a hot cycle or soak it in a bleach solution to kill bacteria. However, if the sponge’s material shows signs of wear or mold, it’s best to replace it. Regular sanitizing extends its life, but safety depends on its condition.

Scotch-Brite Odor Resist Non-Scratch Scrub Sponge, Dishwasher-Safe Kitchen Sponges that Resist Bacterial Odors, Multipurpose Dish Sponge for Gentle Cleaning, 6 Dish Sponges
SIX SCRUBBING SPONGES: This pack of Scotch-Brite Odor Resist Non-Scratch Scrub Sponges includes 1 pack of six sponges.
As an affiliate, we earn on qualifying purchases.
As an affiliate, we earn on qualifying purchases.
Conclusion
To keep your kitchen safe, remember to sanitize your sponge regularly or replace it if it starts to smell or look worn. Imagine cleaning your cutting board with a dirty sponge—it could transfer bacteria and cause illness. By following proper sponge hygiene, you prevent cross-contamination and protect your family’s health. So, stay vigilant: sanitize often and toss when in doubt. A simple habit like this keeps your kitchen cleaner and safer every day.

13W UV Water Sterilizer with 9.84 ft Cable for up to 300 Gallon Aquariums, Ponds & Pools – Professional UV Clarifier for Green Water Control in Koi Ponds, Fish Tanks, Spas & Cold Plunge
PROFESSIONAL-GRADE UV STERILIZATION – Our advanced UV-C technology eliminates 99.99% of harmful buildup and green water that cloud…
As an affiliate, we earn on qualifying purchases.
As an affiliate, we earn on qualifying purchases.
SpOngeBath Concentrated Cleaning Solution 2 Month Supply 8 oz For Use Cleaning Sponge Holder
Kills 99.99% of odor-causing bacteria
As an affiliate, we earn on qualifying purchases.
As an affiliate, we earn on qualifying purchases.